

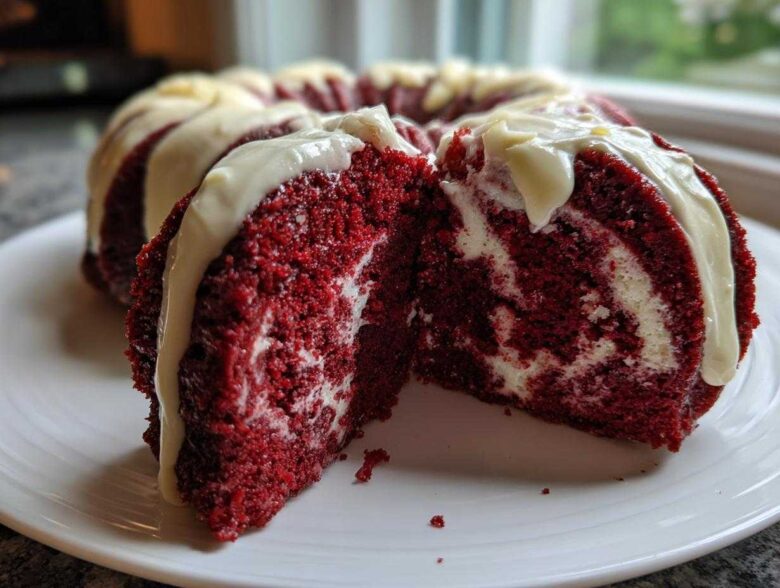
Oh, let me tell you, there is nothing quite as stunning sitting on a dessert table as a perfectly formed Bundt cake. It’s instantly classy, right? But when you make it red velvet? Wow. That’s when it turns into a real showstopper Bundt. For ages, I struggled to get true red velvet flavor in a Bundt pan without it drying out or having weird dense spots. I tried so many ways, but I finally cracked the code! This recipe for the ultimate red velvet bundt cake delivers that signature, slightly chocolatey tang and the most wonderfully moist crumb every single time. You won’t believe how simple it is to get that deep, velvety look without needing to fuss with tricky layers.
Why This Is the Best Red Velvet Bundt Cake Recipe (Showstopper Results)
I’m telling you, this isn’t just *a* recipe; it’s the recipe that finally delivered that true, luxurious texture I always dreamed of when baking this flavor profile in a Bundt. Forget dry cakes! This produces a truly moist bundt cake that holds up beautifully. It has all the flavor of a classic layered version but with none of the frosting drama. It’s the absolute definition of a showstopper Bundt dessert without spending all day in the kitchen.
Achieving the Perfect Velvety Texture in Your Red Velvet Bundt Cake
The secret to that velvety inside doesn’t come from anything fancy—it’s science and temperature control, friend! Make sure your butter and eggs are room temperature; this helps them emulsify properly when you beat them together, trapping all those little air bubbles that give the cake its lift.
And listen closely: once you start adding the flour mixture and that wonderful buttermilk, you have to slow down! Buttermilk is acidic, which is fantastic because it reacts instantly with the baking soda we add. This reaction creates carbon dioxide gas, making the cake rise beautifully and feel tender. Overmixing at this stage knocks all that precious gas out, and suddenly you have a tough, dense cake. Mix until you just don’t see streaks of flour anymore—that’s it!
Tips for a Deep, Rich Red Color in Your Red Velvet Bundt Cake
This is where people go wrong with red velvet; they end up with brownish-red sadness, and nobody wants that! The little bit of cocoa powder we use gives it that classic hint of chocolate, but it dulls the red. To fight that, you need good coloring.
If you are serious about that gorgeous, vibrant hue, skip the standard liquid food coloring. It gets diluted when mixed with the wet ingredients. You absolutely must use a good quality red food coloring gel. It’s concentrated, so a little goes a long way without adding extra liquid to your batter. Dump in the recommended ounce—or even a tiny smidge more if you want it extra festive—and watch the magic happen!
Essential Ingredients for a Tender Red Velvet Bundt Cake
Okay, let’s talk about what goes into this masterpiece. For a successful red velvet bundt cake recipe, you can’t just throw things in; you need the right components working together! When you look at this ingredient list, nothing is overly complicated, but the details on *how* you use them matter hugely, which we’ll cover in a moment. I listed everything below because I want you to have everything ready before you even preheat the oven. These precise measurements are what keeps this a truly moist bundt cake and prevents it from ending up crumbly!
Here’s what you need to raid your pantry for:
- 2 1/2 cups all-purpose flour
- 1 teaspoon baking soda
- 1 teaspoon salt
- 1 tablespoon unsweetened cocoa powder
- 1 cup unsalted butter, softened
- 2 cups granulated sugar
- 2 large eggs
- 1 teaspoon vanilla extract
- 1 cup buttermilk
- 1 teaspoon white vinegar
- 1 ounce red food coloring (liquid or gel)
- 8 ounces cream cheese, softened (for the glaze!)
- 3 cups powdered sugar (for the glaze!)
- 2 tablespoons milk (for the glaze!)
We are making a cake from scratch here, and every piece matters. If you’re looking for a delicious alternative that uses spices instead of red dye, check out these wonderful chai tea-infused scones for a completely different treat!
Ingredient Notes and Substitutions for Your Red Velvet Bundt Cake
I know sometimes you don’t have buttermilk lying around. Don’t sweat it! If you’re in a pinch, you can make your own substitute in about five minutes. Just take that full cup of whole milk you need and stir in one tablespoon of white vinegar or fresh lemon juice. Let it sit on the counter for about five minutes until it curdles up a little bit. That’s your homemade buttermilk, ready to go!
Also, remember what I said about the coloring? If you use liquid, you might need a bit more to get the impact you want. But for the cocoa, stick to the amount listed. You want true red velvet, which means just a whisper of chocolate flavor—it shouldn’t taste like a dark chocolate cake! This small amount of unsweetened cocoa powder gives it that essential velvety depth.
Step-by-Step Instructions for Your Red Velvet Bundt Cake
Alright, time to put this beautiful batter together! Before you even think about grabbing your mixing bowls, let’s talk safety for your pan. Bundt pans look amazing, but they have curves and crevices that love to steal cake! For this recipe, which is a little heavier than a chiffon but still delicate, you have to go overboard on the prep. Preheat your oven to 350 degrees F (175 degrees C) promptly.
The absolute most important first step for successful baking in a Bundt pan is greasing and flouring. I don’t mean just spraying it lightly. I mean getting softened butter or shortening into every valley and ridge, then shaking in flour until every bit of fat is coated. Tap out what dusts off—this step is your insurance policy against a cracked cake!
By the way, if you are looking for another incredible Bundt experience, you simply have to try this cinnamon roll Bundt cake sometime! Now, back to our gorgeous red cake.
Mixing the Batter for a Flawless Red Velvet Bundt Cake
First, whisk together your dry stuff: flour, baking soda, salt, and that small amount of cocoa powder. Set that bowl aside. In your big mixer bowl—remember we creamed that butter and sugar already—beat in the eggs one by one, making sure each one disappears before adding the next. Then hit it with the vanilla.
Now for the color! Mix your buttermilk, vinegar, and all that gorgeous red food coloring right together in a small cup. This is when the color really pops. You’ll alternate adding the dry mix and the colored buttermilk to the butter mixture. Always start and end with the dry items. I add about a third of the dry, mix until just barely combined, then half the liquid, mix gently, and repeat. Do not overmix—I can’t stress that enough if you want that perfect, tender red velvet!
Baking and Cooling Your Red Velvet Bundt Cake Properly
Once that batter is evenly poured into your prepared pan, slide it into that preheated 350-degree oven. It’s going to take between 45 and 55 minutes. Keep an eye on it! You are looking for a wooden skewer inserted very near the center to come out clean. If you see any wet batter clinging, give it five more minutes and check again.
The cooling part is just as crucial as the baking! Let the red velvet bundt cake sit in that warm pan on a wire rack for a short 15 minutes. This gives the structure time to stabilize. If you try to flip it immediately, it might just sag or tear. After 15 minutes, invert it onto the rack, gently lift the pan, and let it cool completely before you even think about glazing it!
Crafting the Tangy Cream Cheese Glaze Cake Topping
Now that your stunning red velvet bundt cake is completely cool—and I mean completely, otherwise the glaze melts into a puddle—it’s time for the best part: the topping! A red velvet cake just isn’t red velvet without that signature tanginess, and we achieve that with a super simple cream cheese glaze cake topping.
This glaze recipe is so easy, it almost feels like cheating, but it tastes like heaven. The key here is texture, which is why we need that cream cheese to be perfectly softened, just like the butter we used earlier. If it’s too cold, you end up with little clumps, and nobody wants lumps in their beautiful drizzle!
To make this, you start by beating that 8 ounces of softened cream cheese until it’s light and creamy—really smooth it out. Then, you add the three cups of powdered sugar gradually. I usually alternate that with the two tablespoons of milk. This alternating step is crucial if you want that perfect, slightly thick, drizzle-across-the-top consistency.
You are looking for a glaze that flows off your spoon but still holds its shape a bit when it hits the cake; it shouldn’t just disappear into the cake surface. If it seems too thick and won’t pour easily, add milk just a half-teaspoon at a time until you get that liquid-but-sweet ribbon effect.
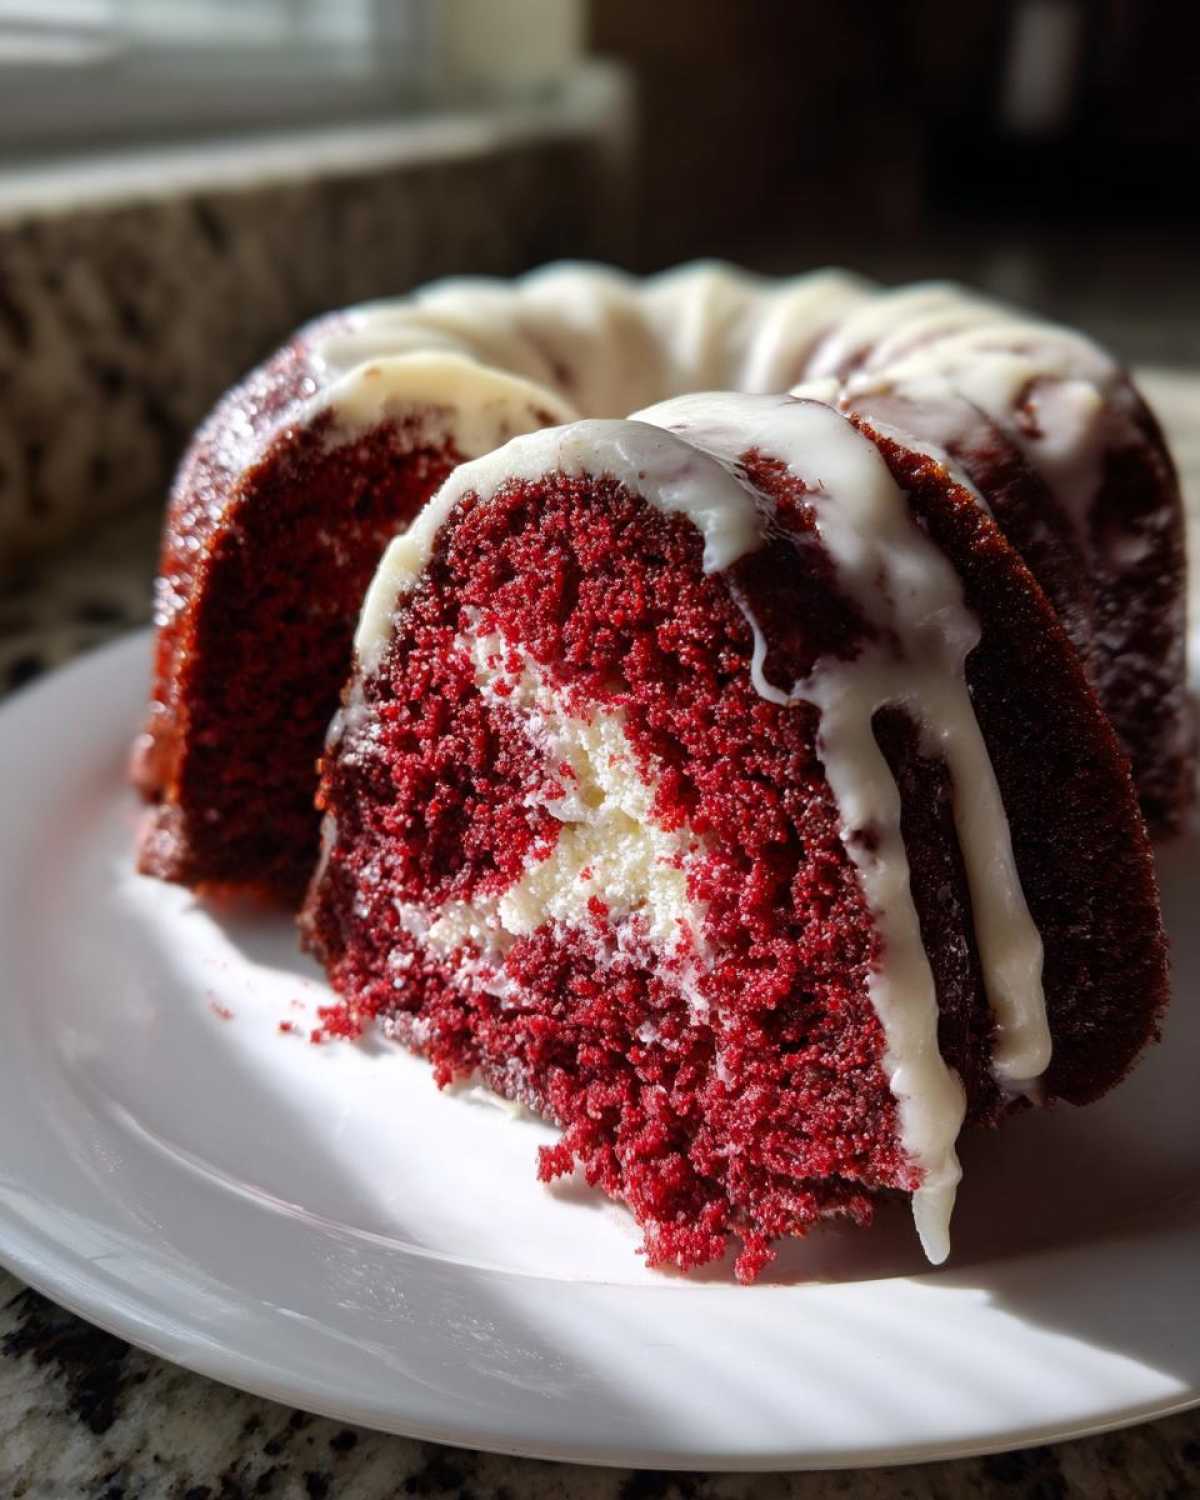
This tangy cream cheese frosting cake topping perfectly cuts through the richness of the cocoa and sugar in the cake. It’s just the right amount of bite! I sometimes add a tiny splash of vanilla or even a microscopic drop of lemon juice if I want to boost that tartness even more. Drizzle it dramatically over the top and watch your guests swoon over this incredible homemade red velvet dessert.
If you adored making this topping, you might also enjoy the frosting situation on my recipe for a great spiced carrot cake—it’s always a winner in the late fall! You can see that recipe here: spiced carrot cake cream cheese frosting.
Tips for a Beautiful Bundt Recipes Presentation of Your Red Velvet Bundt Cake
Once that divine cream cheese glaze has set up, the hard part is over, but now we have to make it look as amazing as it tastes! Since we used a Bundt pan, we are already halfway to an elegant presentation. These beautiful bundt recipes just shine with minimal decoration.
For a simple, sophisticated look, grab a spoon and drizzle that thick glaze back and forth across the cake a few times. Don’t try to coat the whole thing! Leaving some of that deep red showing through is what makes this look so striking. Remember, this is a perfect festive red cake for holidays!
If you want to go one step further—and trust me, it’s worth it—I like to crush up a few pecans or even use some bright red sprinkles right over the wet glaze. They catch the light beautifully. If you’re looking for another showstopper that uses color brilliantly, you have to check out this pink pistachio layer cake. It gives me all the inspiration for next-level holiday decorating!
Storage and Make-Ahead Tips for This Red Velvet Bundt Cake
One of the best things about baking a red velvet bundt cake in this style is that it’s actually better the next day! The flavors just meld together overnight, though you’ll be lucky if there’s any left by morning, trust me.
If you’re making this ahead for a party—say, for Christmas or Valentine’s Day—you have two options, depending on when you want to apply that gorgeous topping.
If you bake the cake one day and plan to glaze the next, just wrap the completely cooled cake tightly in plastic wrap. I usually wrap it gently in foil too, just for an extra barrier against stale air. It stays perfectly moist right on the counter at room temperature for up to two days. Don’t put it in the fridge yet, or the texture might stiffen up a touch!
Holding Off on the Cream Cheese Glaze
I strongly advise waiting to pour the cream cheese glaze until right before you serve the cake. While the glaze is simple, once it sets, it can actually start to draw moisture out of the cake surface if it sits for too long uncovered or refrigerated.
If you *must* glaze early, say, a few hours before serving, keep the cake covered, but know that the glaze might get a little ‘sweaty’ at room temperature. For storage longer than a day, the fridge is okay, but pull it out about an hour before serving to let it warm up slightly so it tastes its best. This cake stores beautifully; it’s certainly sturdy enough to handle being packed up if you’re taking it somewhere, unlike some of those delicate layered tortes! If you like making things ahead, you should also check out my recipe for maple walnut blondies—those are great for freezing!
Frequently Asked Questions About Making a Red Velvet Bundt Cake
It is completely normal to have questions when tackling a recipe this special, especially when you’re using a tricky pan like a Bundt! I’ve been asked the same things by friends dozens of times, so I threw together the most common troubleshooting items right here for you.
Troubleshooting Common Red Velvet Bundt Cake Issues
Why is my beautiful cake looking grayish-brown instead of vibrant red?
Oh, this is the dreaded “no color” issue! Nine times out of ten, this happens because the cocoa powder is interacting too much with the baking soda and the acid in the buttermilk *without* enough dye present to cover it up. The correct chemical reaction turns the cocoa base toward a brownish hue. Solution? Double-check that you used red food coloring gel, not liquid, and be generous with it! Also, ensure your leavening agents (baking soda) aren’t expired, as that can mess with the reaction balance.
Can I really skip the vinegar in the buttermilk mixture?
Please don’t skip it! The vinegar is essential, even though you’re using buttermilk. The vinegar reacts specifically with the baking soda right at the end of mixing to give you that final lift and help you achieve that sought-after tender red velvet texture. If you skip it, your cake will likely be dense and might not set up as nicely in the Bundt pan. It’s just a teaspoon, and you can’t taste it, promise! If you’re looking for ways to adapt things around the kitchen that feel less complicated, you might enjoy this look at an easy layered cake alternative.
What is the best way to ensure this cake comes out of the Bundt pan perfectly?
We talked about prepping the pan earlier, but it bears repeating because it’s so important for this gorgeous dessert! If you are worried about sticking, you can try this trick that works wonders for any easy from scratch bundt cake: after you grease and flour it, take a small brush and dust some extra cocoa powder into the crevices *instead* of flour. Since the cake is red, the cocoa dust blends right in if a tiny bit sticks, and it prevents that white flour residue from showing on your final beautiful presentation.
Is the cream cheese glaze always better than a simple chocolate ganache?
Okay, this is purely personal! For me, yes, the tang of the cream cheese glaze cake topping is non-negotiable with red velvet; it’s the perfect cool counterpoint to the rich, slightly acidic cake. But listen, if you want a dessert that’s less sweet, a simple poured ganache works beautifully too! Just make sure you use a high-quality dark chocolate for that.
I am nervous about making a ‘copycat bundt cake‘ at home—is this too complicated?
Not at all! The reason the commercial versions are so popular is because they are consistent, but I think this homemade version tastes so much richer. The steps are straightforward if you stick to the alternation of wet and dry ingredients. It’s less complicated than trying to frost three perfect layers, honestly!
Estimated Nutritional Data for One Slice
Since this is such a rich, decadent red velvet bundt cake, I always get asked about the numbers. And as a home cook, I have to be honest: these figures are estimates based on the standard ingredients listed! The exact brand of butter, the type of sugar, and how thick you make your drizzle of cream cheese glaze cake topping can all change things slightly.
But for a standard slice of this decadent dessert, here’s what we’re generally looking at, according to my recipe calculator. It’s higher in sugar and fat, naturally, because it’s made with real butter and full-fat dairy—you can taste the quality!
- Serving Size: 1 slice
- Calories: 450
- Sugar: 55g
- Total Fat: 22g
- Carbohydrates: 60g
- Protein: 5g
Just bake it, enjoy it with friends, and don’t sweat the small stuff! While I try to keep my posts focused on flavor and fun, it’s always good to have a general idea. Remember, the rich cocoa content and the buttermilk offer some vitamins, so technically, it’s balanced, right? (Kidding! Mostly.)
Share Your Showstopper Red Velvet Bundt Cake Creation
Now that you’ve conquered the mixing, the baking, and that gorgeous drizzling, I really, really want to see what you made! Honestly, there is nothing better than seeing my recipes come to life in your kitchens. This red velvet bundt cake is such a crowd-pleaser, and I love hearing how it went for you.
Did you get that perfect deep color? Did the tangy cream cheese glaze set up just right? Please leave a rating right below the recipe card and tell me all about your experience! Did you serve it for Valentine’s Day or maybe just a Tuesday because cake shouldn’t wait for a holiday?
If you snap a picture of your finished homemade red velvet dessert—especially if you got that beautiful contrast between the deep red cake and the white glaze—please share it on social media and tag me! I check my mentions all the time, and I love reposting my readers’ successes. Seeing your beautiful work always inspires my next baking adventure!
If you want to browse even more fun things to bake, including some of my favorite holiday hacks and general baking tips, you can always check out my main blog page. Happy baking, everyone!
PrintMoist Red Velvet Bundt Cake with Tangy Cream Cheese Glaze
A recipe for a moist, velvety red velvet cake baked in a Bundt pan, topped with a simple cream cheese glaze.
- Prep Time: 20 min
- Cook Time: 55 min
- Total Time: 75 min
- Yield: 12 servings
- Category: Dessert
- Method: Baking
- Cuisine: American
- Diet: Vegetarian
Ingredients
- 2 1/2 cups all-purpose flour
- 1 teaspoon baking soda
- 1 teaspoon salt
- 1 tablespoon unsweetened cocoa powder
- 1 cup unsalted butter, softened
- 2 cups granulated sugar
- 2 large eggs
- 1 teaspoon vanilla extract
- 1 cup buttermilk
- 1 teaspoon white vinegar
- 1 ounce red food coloring (liquid or gel)
- 8 ounces cream cheese, softened
- 3 cups powdered sugar
- 2 tablespoons milk
Instructions
- Preheat your oven to 350 degrees F (175 degrees C). Grease and flour a 10-cup Bundt pan well.
- In a medium bowl, whisk together the flour, baking soda, salt, and cocoa powder. Set this aside.
- In a large bowl, beat the softened butter and granulated sugar together until light and fluffy.
- Beat in the eggs one at a time, mixing well after each addition. Stir in the vanilla extract.
- In a separate small bowl, mix the buttermilk, white vinegar, and red food coloring until combined.
- Gradually add the dry ingredients to the wet ingredients, alternating with the buttermilk mixture, beginning and ending with the dry ingredients. Mix until just combined; do not overmix.
- Pour the batter evenly into the prepared Bundt pan.
- Bake for 45 to 55 minutes, or until a wooden skewer inserted near the center comes out clean.
- Let the cake cool in the pan for 15 minutes before inverting it onto a wire rack to cool completely.
- To make the glaze, beat the softened cream cheese until smooth. Gradually add the powdered sugar, alternating with the milk, until you reach a smooth, pourable consistency. Add more milk if the glaze is too thick.
- Drizzle the cream cheese glaze over the cooled cake. Allow the glaze to set before slicing and serving.
Notes
- For a deeper red color, use gel food coloring instead of liquid.
- To ensure a moist cake, do not overbake. Check for doneness early.
- If you do not have buttermilk, mix 1 cup of whole milk with 1 tablespoon of white vinegar or lemon juice and let it sit for 5 minutes before using.
Nutrition
- Serving Size: 1 slice
- Calories: 450
- Sugar: 55
- Sodium: 300
- Fat: 22
- Saturated Fat: 14
- Unsaturated Fat: 8
- Trans Fat: 0.5
- Carbohydrates: 60
- Fiber: 1
- Protein: 5
- Cholesterol: 75