

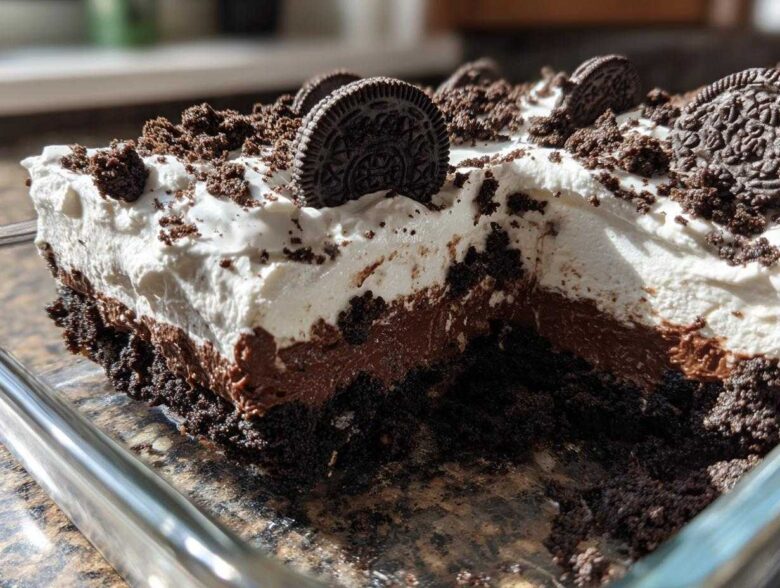
Oh my gosh, you know how sometimes you just crave something completely over-the-top fun that doesn’t require you to even turn on the oven? I swear, my go-to recipe when I need a showstopper that takes zero fuss is this amazing Oreo Dirt Cake. Forget fancy techniques; this is pure nostalgia in a pan! It’s the creamiest, most satisfying layered pudding dessert you’ll ever dunk a spoon into. This isn’t some experimental recipe, either—this is the tried-and-true version my family always brings to summer BBQs and holiday gatherings. It’s no-bake, it’s dangerously good, and assembling it is just messy fun!
Why This No Bake Dirt Cake is the Best Dirt Cake recipe
Seriously, if you need an easy Oreo dessert that disappears instantly, this is it! It’s the ultimate potluck dessert idea because it looks amazing in a big glass dish, and you can customize it for every season. Plus, the kids absolutely adore smashing those cookies—it’s one of the best kid friendly desserts for getting little helpers involved. Don’t worry about baking; we are focusing entirely on that perfect, cool, creamy texture.
Quick Assembly for Your oreo Dirt Cake
The best part? The actual hands-on effort clocks in at maybe 20 minutes tops before it heads to the fridge. We’re talking about mixing two puddings and whipping some cream cheese stuff. The work is done for you while it chills! This quick assembly dessert means you can whip this up right after dinner and it’s totally ready for the next day, no sweat.
Gathering Ingredients for Your Creamy Oreo Dessert
Okay, grabbing the supplies for this wonderful Creamy Oreo Dessert is almost as fun as eating it, especially when you see all that rich chocolate waiting for you. Because we are building layers here, we actually separate the creamy components into two distinct mixes—one chocolate and one vanilla. Don’t panic! It’s just two slightly different batches of deliciousness that stack up perfectly in the end. Here’s what you need to round up for this incredible oreo dirt cake.
For the Crushed Oreo Base and Topping
First things first, we need the dirt! Grab one full package—that’s the 14.3 ounce size—of those fantastic Oreo cookies. You’re going to crush these bad boys up until they look like fine, dark earth. When you’re crushing them, make sure you save about one full cup of those crumbs right off the bat. We need those reserved to sprinkle on top at the very end for that perfect finishing touch!
For the Chocolate Layer of the oreo Dirt Cake
For our first big, dreamy layer, we need all the goodies for that rich chocolate cream. You’ll need the standard 8 ounces of cream cheese, and listen, this *has* to be softened to room temperature, otherwise, you’ll get lumps, and we aren’t making lumpy dirt! Same goes for the 1 cup of unsalted butter—it needs to be softened too. Once those are smooth, slowly add 1 cup of powdered sugar. Next, take one full container—the 12 ounces—of your frozen whipped topping, making sure it’s fully thawed, and gently fold that in. Finally, whisk up two separate packages of the 3.9 ounce instant chocolate pudding mix with 3 full cups of really cold milk until it thickens up, and then lovingly fold that entire chocolate pudding mixture into your cream cheese base. Whew! That’s one layer done!
For the Vanilla Layer of the Layered Pudding Dessert
Now for the slightly lighter, yet equally amazing, second layer! This is what makes the double-layer magic happen in this Layered Pudding Dessert. For this batch, you’ll take another 8 ounces of softened cream cheese and another 1 cup of powdered sugar, and beat those until creamy. Fold in the second 12-ounce container of thawed whipped topping. Then, instead of chocolate, grab one package of the 3.9 ounce instant vanilla pudding mix. Whisk that with 2 cups of cold milk until it gets nice and thick, and fold that vanilla mixture right into your vanilla cream base. See? Two distinct creamy dreams that will become the perfect base for our final oreo dirt cake!
How to Prepare the Best Dirt Cake recipe Step-by-Step
Alright, get ready to see how fast this comes together! The prep time for this whole masterpiece is only about 25 minutes, which is amazing considering you get 12 servings of pure joy out of it. Remember, since this is a No Bake Dirt Cake, all the flavor comes from mixing things perfectly and letting them hang out in the cold! Follow these steps exactly, and you’ll have the very best dessert for your next get-together. If you’ve ever made chocolate chip zucchini muffins, you know that getting the texture right is key, and this is no different!
Preparing the Crushed Oreos for the oreo Dirt Cake
First up is crushing all those Oreos we gathered—we need maximum ‘dirt’ texture! Toss every single one of those cookies into a heavy-duty zip-top bag. Put that bag on a sturdy countertop, grab a rolling pin (the thicker end works best!), and just go to town. Smash them until they are fine, like actual dirt, not huge chunky rocks.
Now, this is important: as soon as you have a big pile of crushed Oreos, use a measuring cup to scoop out about 1 full cup of crumbs and set that aside in a small bowl. That reserved pile is our gorgeous, finishing top layer. Don’t mix it in yet, or you’ll lose that beautiful visual contrast!
Mixing the First Creamy Layer Base
Time to tackle that chocolate layer! Grab your biggest mixing bowl. We start with the building blocks: the softened cream cheese and that 1 cup of softened butter. Beat them together with your mixer until they are completely smooth and creamy—no lumps allowed here, trust me! Once you have that buttery base, slowly sprinkle in that first measure of powdered sugar while mixing on low. Once combined, gently fold in that thawed container of whipped topping. It’s going to look fluffy and pale!
In a separate bowl, whisk up that chocolate pudding mix with the 3 cups of cold milk. Whisk hard for about two minutes until you see it start to really thicken up; it sets fast! Now, gently fold that whole bowl of chocolate pudding right into your cream cheese mixture. You want to incorporate it well, but you don’t want to beat out all the lovely air we just whipped in. That final mix is your first dreamy layer!
Creating the Second Creamy Layer Base
We don’t stop there! Luckily, this second layer is almost identical to the first, just swapping chocolate for vanilla. In a clean bowl (or if you’re feeling lazy like me, just scrape out the first bowl really well—just kidding, use a clean one!), beat that second 8 ounces of softened cream cheese with the second 1 cup of powdered sugar until smooth. Fold in the second container of thawed whipped topping.
Then, whisk that vanilla pudding mix with the 2 cups of cold milk until it sets up nice and thick, just like we did before. Gently fold this vanilla pudding blend into your vanilla cream base. You now have two totally gorgeous, distinct creamy components ready for stacking in your perfect oreo dirt cake!
Assembling Your Layered Pudding Dessert
This is where the fun really begins! Grab your 9×13 inch pan or a big, clear trifle dish so everyone can appreciate the layers. Start by spreading about half of your crushed Oreos right across the bottom of the dish. That first cookie base is non-negotiable for this Layered Pudding Dessert!
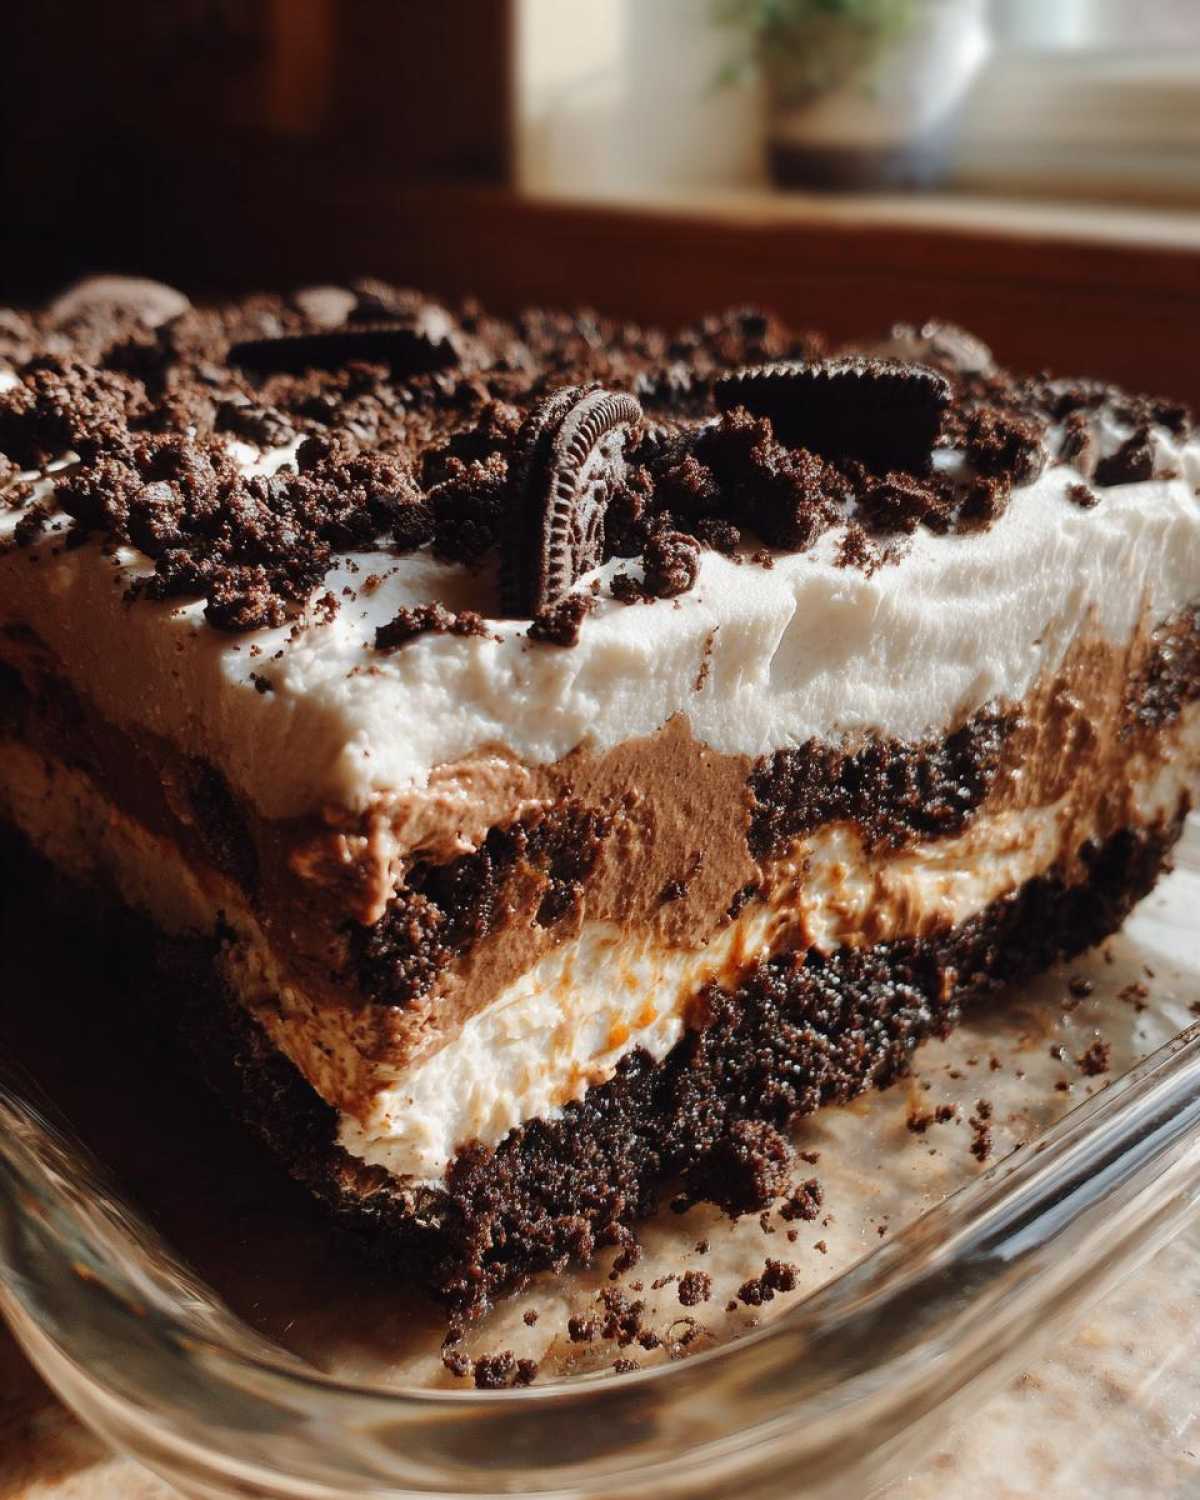
Next, pour every last bit of that chocolate cream mixture evenly over those cookies. Smooth it out gently. Then, take the rest of your crushed cookies (save a dusting for the top!) and spread them right over the chocolate layer. Now, take your entire vanilla cream mixture and spread that evenly on top of the middle cookie layer. Finally, take the reserved 1 cup of crushed Oreos you set aside earlier and sprinkle that gorgeous dark topping all over the very top! That’s the finish line for assembly!
Chilling Time for Perfect No Bake Dirt Cake Texture
We’re done assembling, but we aren’t done making the magic happen! This step is crucial for a firm, sliceable No Bake Dirt Cake. You MUST cover that dish tightly with plastic wrap and pop it into the refrigerator. If you are in a rush, give it at least 4 hours to firm up nicely.
But—and this is my expert advice—if you can possibly wait, let it chill overnight! Seriously, letting this No Bake Dirt Cake rest for 8 to 12 hours allows those pudding layers to totally solidify around the crumbs. When you cut into it the next day, it holds its shape beautifully, and the flavor develops even more. Trust me on the overnight chill!
Tips for Success with Your oreo Dirt Cake
Listen, even though this is a super straightforward oreo dirt cake, a few little tricks I picked up over the years make the difference between a good one and the absolute best one. I leaned heavily on the little scribbled notes in the margins of my recipe card when figuring out the best way to make sure this thing sets up perfectly. These tips will take your simple layering from good to professional!
Achieving the Smoothest Creamy Oreo Dessert
If you check the recipe, you saw I asked for softened cream cheese and softened butter. I can’t stress this enough: room temperature ingredients are your best friend when whipping up any creamy base, especially one that needs to hold up pudding! If the cream cheese is cold, it won’t incorporate smoothly with the butter and sugar, and you end up with little hard lumps, which ruins the whole vibe of this Creamy Oreo Dessert.
My trick? I usually take them out three hours before I plan to mix. If I’m running late, I chop the cream cheese into small cubes and let it sit on the counter while I start crushing cookies. Make sure everything is pliable when it goes into the mixer—that’s the secret to getting that luxurious, lump-free texture!
Variations on the Classic oreo Dirt Cake
Part of the fun with this recipe, other than how easy it is, is how much you can mess around with the flavor. You can absolutely swap out pudding flavors if you don’t want the chocolate/vanilla combo. I once made a batch where I used butterscotch pudding for the second layer, and wow, it was like a fancy little caramel surprise!
Another cool hint I’ve tried, courtesy of a family friend who makes an amazing maple walnut blondies recipe, is how to change up the look. If you want a deeper, more intense chocolate look on top—maybe you’re making a spooky Halloween Dirt Dessert—skip reserving the crushed Oreos for the very top. Instead, just dust the top layer of cream with a fine layer of unsweetened cocoa powder before you chill it. It gives the ‘dirt’ a different texture and a slight, delicious bitterness!
Serving Suggestions for This Dirt pudding recipe
After all that layering and chilling, you want to serve this rich, glorious dirt pudding recipe right? Because this is such a heavy, decadent dessert—we’re talking cream cheese and butter, people!—I always pair it with something light and tart on the side. It just balances everything out perfectly.
If I’m taking this to a big summer gathering or a potluck dessert ideas spread, I usually prepare a big pitcher of something brightly flavored to cut through all that chocolate richness. My absolute favorite companion is a homemade lemonade, maybe spiked with some berry flavor—I made this incredible lavender strawberry lemonade spritzer last weekend, and it was the perfect foil!
When you serve it straight from the dish, scoop deep so everyone gets a little bit of the bottom cookie layer, the chocolate cream, and the vanilla layer. If you’re serving it in clear little cups or mason jars (which, by the way, are fantastic for portion control!), you can stick a gummy worm right out of the ‘dirt’ halfway through chilling. It’s fun, it’s silly, and it lets everyone know exactly what they are about to eat!
Storage and Make Ahead Dessert Options for oreo Dirt Cake
This is my absolute favorite part about making this dessert: it practically begs you to make it ahead of time! It is the ultimate Make Ahead Dessert because it actually tastes better the longer it sits in the fridge. You can’t really ‘reheat’ something with pudding and cream cheese, can you? No way! The focus here is entirely on proper chilling so everything merges into that perfect, solid block of creamy chocolate goodness.
Since this is loaded with dairy and pudding, keep your amazing oreo dirt cake tightly covered right in the refrigerator. It needs that cold environment to stay firm and safe. If you chilled it overnight—which, hello, you should have!—it will hold up beautifully for about three full days on the shelf of your fridge. The longer it sits, the softer the crushed Oreos become, blending even more seamlessly with the cream layers—less ‘dirt’ crunch and more rich, dense filling!
If you are short on time but still want that make-ahead benefit, try making the two creamy components (the chocolate and the vanilla mixtures) a full day ahead of time. Keep them separate in airtight containers in the fridge. Then, when you’re ready to assemble, just layer the crushed Oreos and the two creams right before you want to serve the next day. That way, the cookies still have a tiny bit more structure if that’s how you like them! This really helps when I’m trying to juggle making no-bake gingerbread energy balls at the same time.
For transport to picnics or parties, I always use a dish with a tight-fitting lid, or I wrap the whole 9×13 pan securely in plastic wrap and then cover it with foil. Keeping it super cold until serving time is the key to keeping this No Bake Dirt Cake looking gorgeous and tasting perfectly set!
Frequently Asked Questions About oreo Dirt Cake
Can I use homemade whipped cream instead of frozen whipped topping in this No Bake Dirt Cake?
Oh, that’s a great question about texture! You certainly *can* use homemade whipped cream, but you need to be careful. The frozen whipped topping acts as a stabilizer for us in this recipe, helping those layers stay separate without melting into mush while they chill. If you make your own fresh whipped cream, I strongly suggest you stabilize it first. You can do that by whipping in a tablespoon or two of powdered sugar and maybe a teaspoon of pudding mix or cornstarch when you reach soft peaks. If you don’t stabilize it, your lovely No Bake Dirt Cake layers might start melding together way too soon, and you want those distinct chocolate and vanilla ribbons!
How long does the oreo dirt cake stay fresh in the refrigerator?
Because this entire dessert is creamy and loaded with that pudding goodness, it needs to stay quite cold. If you’ve made it the way I suggested—chilling it overnight—it still tastes fantastic for a solid 3 to 4 days. After about day four, the moisture from the pudding starts really saturating the Crushed Oreo Dessert layers, and while it’s still perfectly safe to eat, the cookies lose their slight bit of structure and can get a little too soft for my liking. If you plan on having leftovers, just cover it really tightly with plastic wrap right down to the surface of the dessert to prevent any fridge smells getting in!
What is the best way to crush the Oreos for the ‘dirt’ layer?
Honestly, my absolute favorite way, because it’s just so satisfying and gives you that slightly imperfect, natural-looking ‘dirt’ texture, is the rolling pin method I mentioned earlier. Just toss them in a big zip-top bag and whack away! You get a nice mix of fine dust and small, satisfyingly crunchy bits.
However, if you are making a huge batch and need speed, a food processor is your friend! Pulse them in short bursts until they reach that fine consistency, but watch it carefully. If you run the processor too long, the oils in the cream filling will release, and you’ll end up with a dark, oily paste instead of crumbly ‘dirt’—which is just not the same feel for this dessert! If you want to check out another fun way to use Oreos, take a peek at how I make oreo sushi!
Estimated Nutritional Data for Classic No Bake Dirt Cake
Now, because this dessert involves butter, cream cheese, and plenty of sugar, it’s definitely an indulgence, right? Nobody is making this thinking it’s salad! But I always like to give a rough idea of what you’re looking at, just so you know where you stand. These numbers are estimates based on using the ingredients listed for this recipe, yielding 12 standard servings.
- Serving Size: 1 serving
- Calories: About 450
- Fat: Roughly 25 grams (watch that saturated fat!)
- Carbohydrates: Around 55 grams
- Sugar: Around 45 grams
- Protein: About 5 grams
Keep in mind that if you decide to use different pudding flavors or substitute any of the cream components, these numbers will shift a bit! It’s just a guideline so you can enjoy the richness of this amazing dessert responsibly!
Share Your Experience with This oreo Dirt Cake
I pour my heart into making sure this oreo dirt cake turns out perfectly every single time, and I really hope you love the creamy texture as much as my family does! Once you’ve had a chance to chill it properly and serve up those big slices (remember, this recipe makes about 12 servings!), I would be absolutely thrilled if you came back here and let me know how it went.
Did you add a gummy worm at the end? Did you try a different pudding flavor? Drop a comment below, rate this recipe from one to five stars, and share your experience! If you end up snapping a picture of your beautiful layers, tag me on social media—I love seeing everyone enjoying my favorite easy desserts!
If you need any more simple recipes or want to get in touch regarding substitutions or techniques, don’t hesitate to check out my contact page for a chat!
Estimated Nutritional Data for Classic No Bake Dirt Cake
Now, because this dessert involves butter, cream cheese, and plenty of sugar, it’s definitely an indulgence, right? Nobody is making this thinking it’s salad! But I always like to give a rough idea of what you’re looking at, just so you know where you stand. These numbers are estimates based on using the ingredients listed for this recipe, yielding 12 standard servings.
- Serving Size: 1 serving
- Calories: About 450
- Fat: Roughly 25 grams (watch that saturated fat!)
- Carbohydrates: Around 55 grams
- Sugar: Around 45 grams
- Protein: About 5 grams
Keep in mind that if you decide to use different pudding flavors or substitute any of the cream components, these numbers will shift a bit! It’s just a guideline so you can enjoy the richness of this amazing dessert responsibly!
Share Your Experience with This oreo Dirt Cake
I pour my heart into making sure this oreo dirt cake turns out perfectly every single time, and I really hope you love the creamy texture as much as my family does! Once you’ve had a chance to chill it properly and serve up those big slices (remember, this recipe makes about 12 servings if you use a 9×13 pan!), I would be absolutely thrilled if you came back here and let me know how it went.
Did you add a gummy worm at the end? Did you try a different pudding flavor? Drop a comment below, rate this recipe from one to five stars, and share your experience! If you end up snapping a picture of your beautiful layers, tag me on social media—I love seeing everyone enjoying my favorite easy desserts!
If you need any more simple recipes or want to get in touch regarding substitutions or techniques, don’t hesitate to check out my contact page for a chat!
PrintClassic No-Bake Oreo Dirt Cake
A simple, creamy, no-bake dessert featuring layers of crushed Oreos, sweet cream cheese mixture, and chocolate pudding. This recipe is perfect for parties and gatherings.
- Prep Time: 25 min
- Cook Time: 0 min
- Total Time: 4 hr 25 min
- Yield: 12 servings
- Category: Dessert
- Method: No Bake
- Cuisine: American
- Diet: Vegetarian
Ingredients
- 1 package (14.3 ounces) Oreo cookies
- 1 package (8 ounces) cream cheese, softened
- 1 cup unsalted butter, softened
- 1 cup powdered sugar
- 1 container (12 ounces) frozen whipped topping, thawed
- 2 packages (3.9 ounces each) instant chocolate pudding mix
- 3 cups cold milk
- 1 package (8 ounces) cream cheese, softened (for the second layer)
- 1 cup powdered sugar (for the second layer)
- 1 container (12 ounces) frozen whipped topping, thawed (for the second layer)
- 1 package (3.9 ounces) instant vanilla pudding mix (for the second layer)
- 2 cups cold milk (for the second layer)
Instructions
- Place all Oreo cookies in a large zip-top bag. Crush them finely using a rolling pin until they resemble dirt. Set aside about 1 cup of crumbs for topping.
- In a large bowl, beat the softened cream cheese and butter until smooth. Gradually add 1 cup of powdered sugar and mix until combined. Fold in 1 container of thawed whipped topping. This is your first creamy layer base.
- In a separate bowl, whisk together the chocolate pudding mix and 3 cups of cold milk until thickened, about 2 minutes. Gently fold the chocolate pudding mixture into the cream cheese mixture.
- In a separate bowl, beat the second package of softened cream cheese and 1 cup of powdered sugar until smooth. Fold in the second container of thawed whipped topping.
- In another bowl, whisk the vanilla pudding mix with 2 cups of cold milk until thickened. Fold the vanilla pudding into the cream cheese and whipped topping mixture. This is your second creamy layer base.
- To assemble, use a large trifle dish or 9×13 inch pan. Spread half of the crushed Oreos on the bottom.
- Spread the entire chocolate cream cheese mixture evenly over the cookie layer.
- Top the chocolate layer with half of the remaining crushed Oreos.
- Spread the entire vanilla cream cheese mixture evenly over the cookie layer.
- Top the vanilla layer with the remaining crushed Oreos.
- Cover the dish and chill in the refrigerator for at least 4 hours, or preferably overnight, before serving.
Notes
- For a faster assembly, you can layer the ingredients in individual clear cups instead of a large dish.
- If you prefer a firmer texture, chill the pudding mixtures for 10 minutes before folding them together.
- You can substitute any flavor of pudding you prefer for the vanilla layer.
Nutrition
- Serving Size: 1 serving
- Calories: 450
- Sugar: 45
- Sodium: 350
- Fat: 25
- Saturated Fat: 15
- Unsaturated Fat: 10
- Trans Fat: 0
- Carbohydrates: 55
- Fiber: 2
- Protein: 5
- Cholesterol: 55