

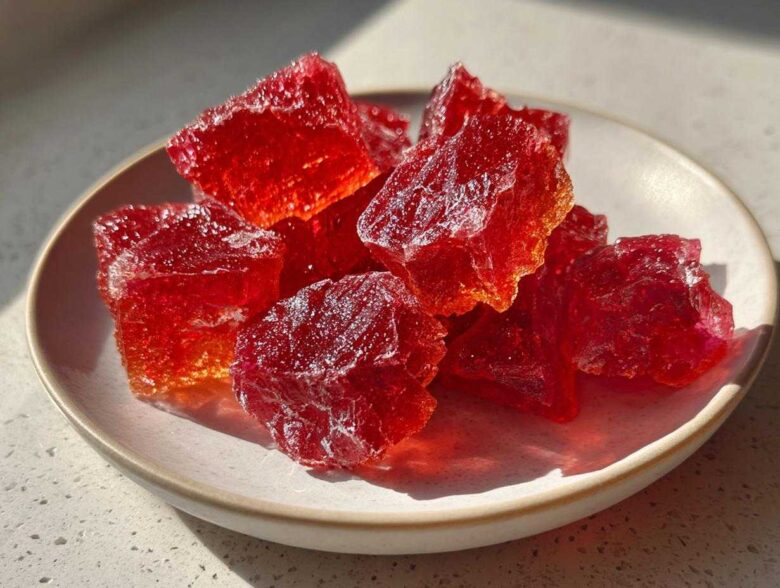
Oh my gosh, do you remember those truly old-fashioned candies from when you were little? The ones that looked like tiny, vibrant jewels and had that amazing, sharp snap when you bit into them? I have been trying to nail the perfect version of **cinnamon rock candy** forever, and I finally cracked the code!
Forget the soft, chewy stuff; we are going for that classic, crunchy, spicy-sweet goodness that just transports you back in time. Making hard candy can feel super intimidating—I get it! It all hinges on hitting that magical temperature with your thermometer. But don’t you worry, I’m going to walk you through exactly how I do it every single time to get these gorgeous, bright red, spicy little shards. This is maybe the best DIY holiday candy you’ll ever attempt!
Why This Old-Fashioned Cinnamon Rock Candy Recipe Works (Sweet and Spicy Treats)
The difference between a soft candy and true, shatteringly crisp **old fashioned rock candy** comes down to physics, really! My secret weapon here is twofold: we absolutely must nail the hard-crack stage—that’s 300 degrees F—and we need serious flavor depth. That’s where the cinnamon oil comes in.
If you try to skimp on the temperature or the flavorings, you end up with something sticky, not crunchy. We are aiming for the very best of **spicy cinnamon sweets**, and trust me, following my temperature guidance makes all the difference in texture. This isn’t your grandma’s watered-down candy; this has a kick!
Key Elements for Perfect Cinnamon Rock Candy
First off, throw away any assumptions you have about free-pouring sugar! You need an accurate candy thermometer. Seriously, guessing here leads to weeping, soft candy, and that’s just sad. The thermometer is your best friend!
Also, you’ll see light corn syrup listed, and that little guy is crucial. It stops the sugar molecules from getting too big and grouping together. So when we boil everything up, instead of getting those grainy crystals when it cools, we get that smooth, clear glass-like appearance. A little bit of science goes a long way when you’re chasing that nostalgic bite!
If you’re looking for more trips down memory lane, you have to check out these nostalgic candy recipes on the blog later!
Gathering Your Ingredients for Homemade Cinnamon Rock Candy
Okay, let’s get our list together! Since this is the blueprint for true **cinnamon rock candy**, we can’t mess around with the ratios. You need 2 cups of regular granulated sugar, about 2/3 cup of light corn syrup—please don’t skip it—and 3/4 cup of plain water. That’s the crystalline base!
Now for the fun part: the fire! You absolutely want 1 teaspoon of pure cinnamon oil if you can swing it. That oil is potent, it’s strong, and it delivers that sharp, spicy punch we’re looking for. If you only have extract, go for about a tablespoon, but mix it in *right* at the end because the boil will cook off most of its kick. And of course, we need that vibrant red coloring to make these look like real rocks!
Ingredient Notes and Flavor Substitutions for Cinnamon Hard Candy
When it comes to the cinnamon flavoring for your **cinnamon hard candy tutorial**, please use the oil for the best results; it’s concentrated heat! If you taste-test the oil before mixing it in, just touch the tip of a toothpick to it—that’s enough for the whole batch!
I sometimes add a tiny pinch of citric acid—it’s optional, but it really wakes up the sweetness with a little tartness. It balances those rich, **sweet and spicy treats** perfectly. Remember, we’re aiming for classic flavor here, so quality matters on these few components!
When you’re done making this batch, you might want a calmer flavor profile, so definitely check out my cinnamon almond coffee recipe. It’s delicious!
Essential Equipment for Your Cinnamon Rock Candy Tutorial
Okay, let’s talk tools! You can’t whip this up in just any old pot, so make sure you grab the right gear. The first non-negotiable item is a reliable candy thermometer. I cannot stress this enough for your **beginner candy making** adventure; it’s your thermometer or failure, honey!
You also absolutely need a heavy-bottomed saucepan. This helps distribute the heat evenly so you don’t scorch the bottom of your sugar syrup before you even hit temperature. And finally, grab a good silicone mat or parchment paper for your sheet pan. You need a non-stick surface because once this stuff sets, it sets HARD!
If you’re thinking about what to do with the leftover energy after all that stirring, try looking at the recipe for these candy cane crunch bars—they use a similar concept but no boiling!
Step-by-Step Instructions: How to Make Rock Candy at Home
Alright, time for the action! Before we even turn the heat on, line that baking sheet with parchment or a silicone mat, and give it a tiny spritz of oil—just enough to stop the syrup from grabbing on for dear life. Now, get that sugar, corn syrup, and water into your heavy saucepan. We stir this over medium heat until everything dissolves. You need that sugar completely gone before you even *think* about letting it boil, or things get messy fast!
Once it’s crystal clear, pop that candy thermometer in—make sure the tip isn’t touching the bottom of the pot! Crank the heat up to medium-high. This is where we wait. Don’t stir it! Just let it boil away until that little needle ticks right up to 300 degrees F. When you hit that mark, you are officially at the hard-crack stage, and you need to jump into action!
As soon as you register 300 degrees, yank that pan off the burner immediately. If you leave it on the heat, it will keep climbing and burn! Quickly—but gently—stir in your red coloring, that potent cinnamon oil, and the citric acid if you’re using it. Stir just enough to swirl it together. Seriously, just a couple of gentle turns. We don’t want to stir up any crystals!
Then, pour that bubbling red lava right onto your prepared sheet. Don’t spread it, don’t touch it, just let it puddle and cool naturally. After about 40 minutes, you will have a solid sheet of gorgeous, spicy candy. My favorite candy cane fudge brownies recipe is way easier, but this is worth the effort!
Achieving the Hard-Crack Stage Safely in Your Cinnamon Rock Candy
Let’s talk about 300 degrees F. That temperature is everything for perfect **cinnamon rock candy**. Anything lower, and you’ll have sticky, soft candy that never really sets right. It has to hit that high mark to ensure the water content is cooked out enough to create that satisfying, brittle texture.
The biggest mistake people make is stirring after the boil starts, or even worse, over-stirring once the flavorings go in. When you add that cinnamon oil right after removing it from the heat, stir only until you see the color even out. Over-vigorous mixing at this point introduces air bubbles that can look great initially, but they break down as it cools, leading to cloudiness or crystallization. Keep it calm and quick!
Breaking and Storing Your Crunchy Cinnamon Snack
Once that sheet is totally cool—give it a good 45 minutes to make sure it’s rock solid—it’s time for the fun destruction part! Slide the whole sheet of candy into a heavy-duty zip-top bag. I mean heavy duty, because this stuff is hard!
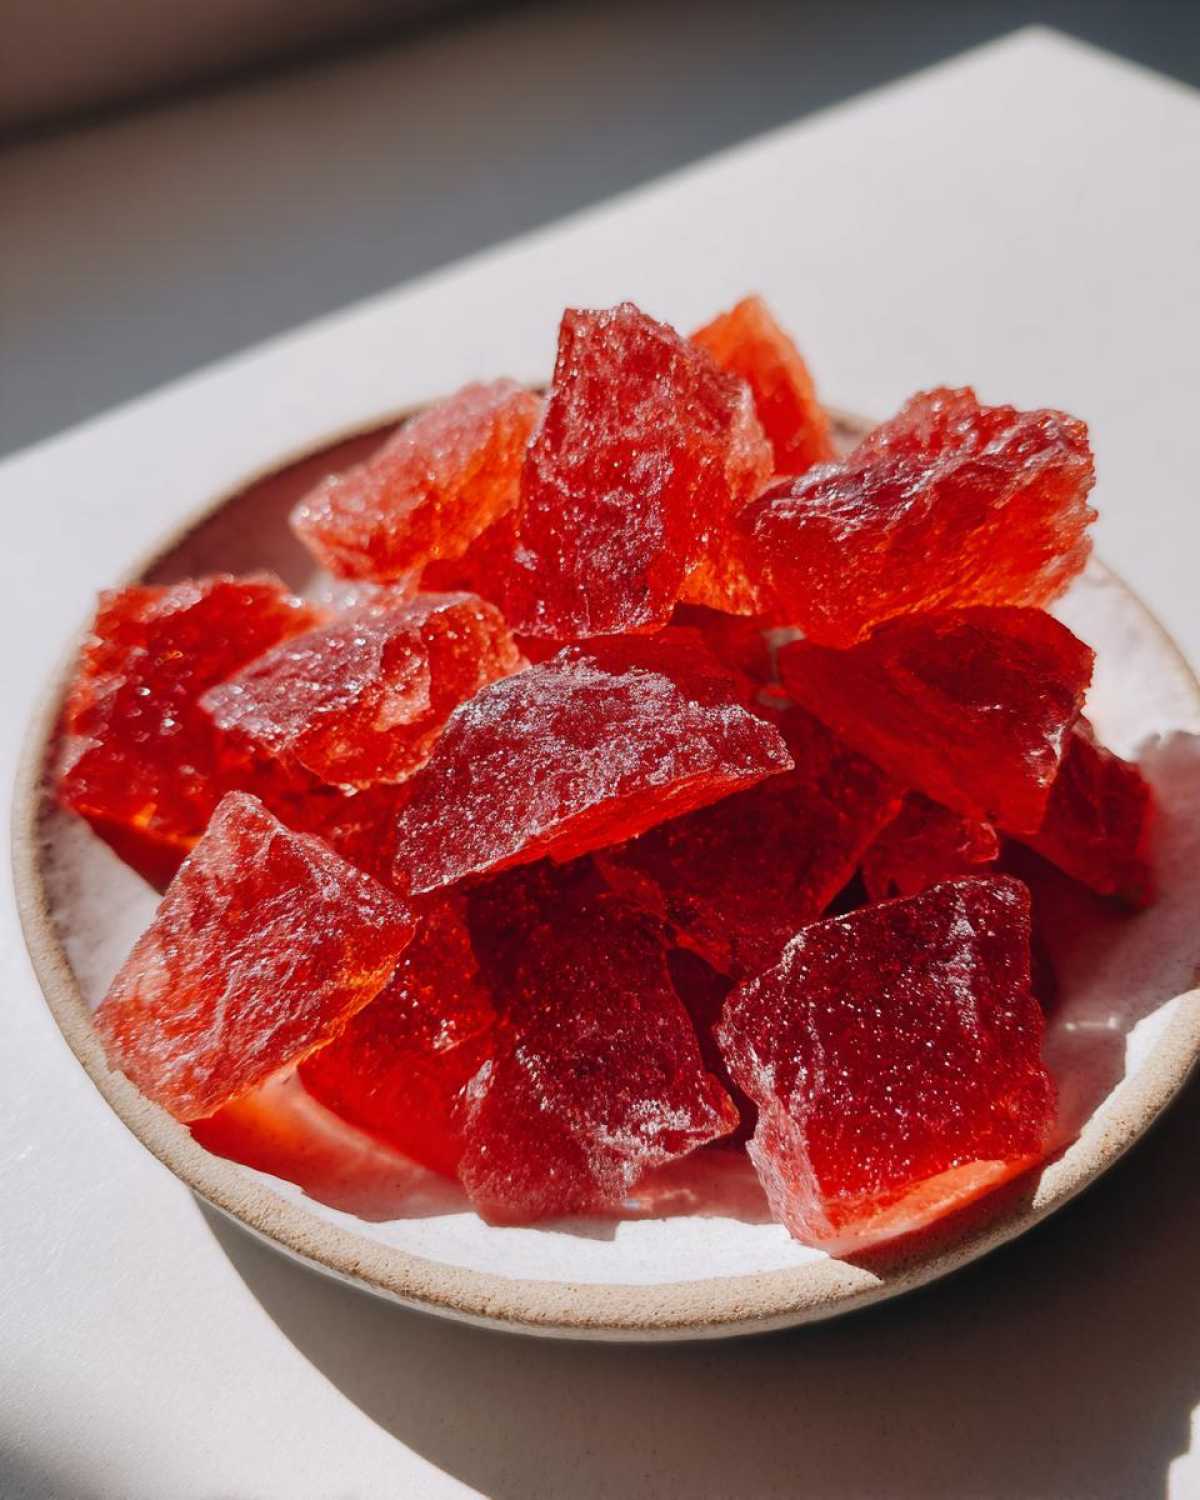
I put the bag right on the counter and use a meat mallet or the back of a sturdy wooden spoon to give it a good whack. You’ll end up with these fantastic, irregular pieces. That’s why it’s called **crunchy cinnamon snack**, right? Store these irregular shapes in an airtight container at room temperature. Don’t put them in the fridge; humidity is the enemy of hard candy!
Tips for Success When Making Cinnamon Rock Candy
Look, even when you follow the rules, sometimes sugar decides to be difficult. That’s just the nature of working with high heat! If you notice your syrup starting to look grainy or cloudy while it’s still on the stove—that’s crystallization creeping in. Don’t panic! This happens to even the best **beginner candy making** experts.
If this happens while you’re making your **cinnamon rock candy**, quickly add just one tablespoon of water and gently, very gently, stir until those little grainy crystals disappear back into the smooth syrup. Then get it back to the heat like nothing happened. The second you remove the pan from the burner for flavoring, you gotta be quick, so have your oil and coloring ready right next to the stove!
And here’s my big tip about storage: humidity is the absolute arch-nemesis of hard candy. If you make this on a super rainy or muggy day, you might find your beautifully smashed rocks start getting sticky overnight. Store them in a dry, airtight container, maybe even toss in a couple of those little food-safe silica packets you find in new shoes if you have them!
For less temperamental, but equally yummy treats, these candy cane marshmallow pops are perfect for gifting, too!
Serving Suggestions for Your Spicy Cinnamon Sweets
So now you have this beautiful, vibrant batch of **spicy cinnamon sweets**! What do you do with them besides just crunching handfuls straight out of the bag? Well, they are phenomenal for gifting, honestly. Tuck them into clear cellophane bags with a little festive ribbon—instant, impressive, **gifting candy recipes**!
I also love smashing a few of the pieces really finely and sprinkling them over vanilla ice cream or even crushed over my morning oatmeal for an extra kick. They make such fun, crunchy accents on holiday baked goods, too. Think of them as beautiful, fiery little sprinkles for topping whipped cream or trimming spiced orange biscotti!
If you’re having a gathering, these little rocks are the best **edible party favors** you can put out—they look so festive mixed into a big glass jar.
Frequently Asked Questions About Cinnamon Rock Candy
I get so many questions about this recipe, which just proves everyone loves a good nostalgic candy moment! Here are the things folks ask me most often about turning sugar into glorious, crunchy spice.
Can I use cinnamon extract instead of oil for this easy hard candy recipe?
Yes, you absolutely can! But listen closely: cinnamon oil is way stronger, so if you use the extract, you’ll need to bump up the amount from 1 teaspoon to about 1 heavy tablespoon. The oil is the secret weapon for that intense flavor, but the extract works fine for this **easy hard candy recipe** if that’s what you have on hand. Just make sure you add the extract *right* at the end, off the heat, to save its flavor!
How do I get the vibrant red candy color?
You want that super bright, almost neon red, right? That comes purely from food coloring. I use liquid coloring, but gel works even better if you have it. You add this right when you add the cinnamon flavorings—so, right after you take the pot off the 300-degree heat. Stir it quickly into the hot syrup until it’s fully distributed. That vibrant color is what makes these such fun **classic Christmas candy** when you gift them!
Is this a suitable DIY holiday candy for beginners?
It is much more approachable than you think, provided you follow one rule religiously: use a candy thermometer! Temperature control is the difference between success and a sticky mess. If you’re comfortable using one, then yes, this is a fantastic **DIY holiday candy** project for beginners. If you are terrified of the high heat, maybe stick to no-bake recipes first, but honestly, mastering this temperature is so rewarding!
If you want another fun, lower-stress candy to try, check out my recipe for hot cinnamon apple cider donuts—they are pure comfort!
Estimated Nutritional Data for Cinnamon Rock Candy
Now, I have to give you the grown-up talk for a second—this is pure sugar, so we aren’t calling it a health food! But, since I know so many of you are curious about what goes into these wonderful crunchy snacks, here are the estimated stats.
Remember, this is just an estimate based on the ingredients I gave you for the **homemade cinnamon candy**. This assumes you make the recipe as written and divide it into rough 1-ounce servings. Treat this as a fun guide, not medical advice, okay?
Here’s the estimate based on a 1-ounce serving:
- Serving Size: 1 ounce
- Calories: 110
- Sugar: 28g (Yep, that’s where all the energy comes from!)
- Sodium: 1mg (Barely anything!)
- Fat: 0g
- Protein: 0g
- Cholesterol: 0mg
It’s definitely a rich source of pure carbohydrates, which is what gives you that satisfying energy burst when you snack on this treat. If you are using this to top something else, just factor in the extra sugar!
Speaking of easy cinnamon treats, if boiling sugar seems like too much right now, you absolutely MUST try my apple cinnamon mug cake recipe. It’s ready in under five minutes!
Share Your Homemade Cinnamon Rock Candy Creations
Whew! You did it! You mastered the terrifying world of hard candy making, and now you have the best **cinnamon rock candy** right on your counter. I am so proud of you!
Seriously, when you make your next batch, snap a picture of those beautiful red shards and tag me! I want to see how you’re using them—are you gifting them for Christmas, or are you just sitting on the couch crunching them immediately? Let me know in the comments below and don’t forget to rate the recipe. Happy crunching!
If you want more fun baking inspiration, check out the main page again at the blog!
PrintOld-Fashioned Cinnamon Rock Candy
Make crunchy, spicy cinnamon rock candy at home using this simple technique that focuses on reaching the hard-crack temperature for perfect results.
- Prep Time: 5 min
- Cook Time: 20 min
- Total Time: 65 min
- Yield: About 2 cups
- Category: Dessert
- Method: Stovetop Boiling
- Cuisine: American
- Diet: Vegetarian
Ingredients
- 2 cups granulated sugar
- 2/3 cup light corn syrup
- 3/4 cup water
- 1 teaspoon cinnamon oil (or 1 tablespoon cinnamon extract)
- 1/2 teaspoon red food coloring (liquid or gel)
- Pinch of citric acid (optional, for tartness)
Instructions
- Line a baking sheet with parchment paper or a silicone mat. Lightly grease the surface with cooking spray or neutral oil.
- Combine the sugar, corn syrup, and water in a heavy-bottomed saucepan. Stir over medium heat until the sugar dissolves completely. Do not let the mixture boil before the sugar is dissolved.
- Insert a candy thermometer into the pan, making sure the tip does not touch the bottom.
- Increase the heat to medium-high and boil the mixture without stirring. Allow the syrup to reach 300 degrees Fahrenheit (149 degrees Celsius), which is the hard-crack stage. Watch carefully as it nears the temperature.
- Once the mixture reaches 300 degrees F, immediately remove the pan from the heat. Carefully stir in the cinnamon oil, red food coloring, and citric acid (if using). Stir only until combined; over-stirring can cause crystallization.
- Quickly pour the hot syrup onto the prepared baking sheet. Do not spread or touch the candy while it cools.
- Allow the candy to cool completely and harden, which takes about 30 to 45 minutes.
- Once fully hardened, place the candy sheet into a large, sturdy zip-top bag. Cover the bag with a clean kitchen towel. Use a meat mallet or the back of a heavy spoon to carefully break the candy into small, irregular ‘rock’ pieces.
- Store the finished candy in an airtight container at room temperature.
Notes
- Use a candy thermometer for accuracy; temperature control is the most important step for hard candy.
- If the syrup starts to crystallize during cooking (forming grainy spots), add one tablespoon of water and gently stir until the crystals dissolve before continuing to heat.
- Cinnamon oil provides a much stronger, more authentic flavor than extract, but use it sparingly as it is potent.
- If you do not have cinnamon oil, use 1 tablespoon of high-quality cinnamon extract, but add it right before pouring to minimize flavor loss from the heat.
Nutrition
- Serving Size: 1 ounce
- Calories: 110
- Sugar: 28g
- Sodium: 1mg
- Fat: 0g
- Saturated Fat: 0g
- Unsaturated Fat: 0g
- Trans Fat: 0g
- Carbohydrates: 28g
- Fiber: 0g
- Protein: 0g
- Cholesterol: 0mg