

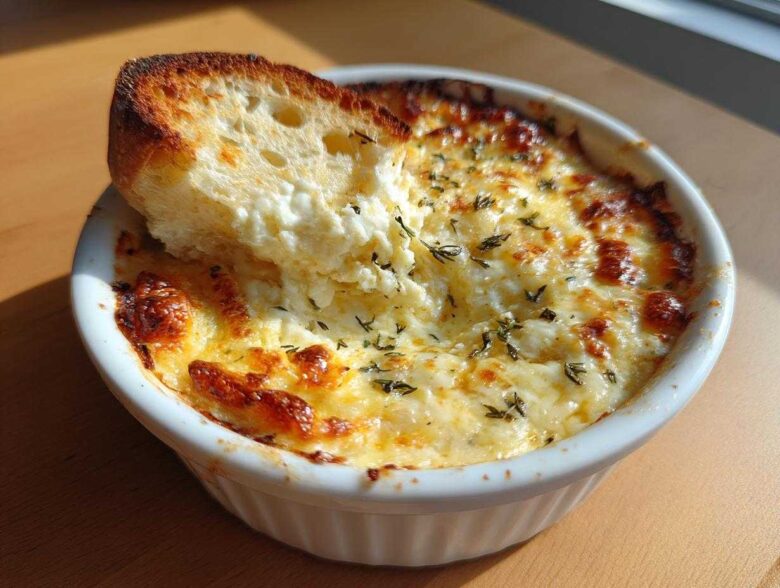
When you’re scrambling to feed a crowd and need something that disappears immediately, you can’t beat an amazing appetizer. Forget fussy little bites that take forever; I always fall back on my Creamy Baked Garlic Bread Dip. Honestly, this is the ultimate bread dip because it’s hot, gloriously cheesy, and comes together so quickly you’ll be amazed. This particular recipe isn’t just something I found online; it’s a tried-and-true favorite that I’ve been serving at every single party, game night, and last-minute gathering for years. You can find tons of great inspiration for easy appetizers over on my main blog page. Trust me, you are going to want this in your rotation!
Why This Creamy Baked Garlic Bread Dip is the Best Bread Dip
There are so many recipes out there for simple dipping sauces, but this baked version truly shines, especially when you’re planning for major party appetizers. This isn’t your sad, room-temperature onion dip, no sir! This is one of those stellar hot appetizer recipes that people immediately gravitate towards the second it comes out of the oven. Everyone loves that golden, bubbly crust and how rich it is. It completely elevates snack time, whether it’s for a big holiday or just a quiet Friday night. If you’re looking for more great ideas for big gatherings, check out my collection of essential party appetizers.
Perfect Texture: Creamy Dips Every Time
We owe the amazing texture entirely to the base ingredients. It isn’t just cheese; it’s that perfect marriage of softened cream cheese and sour cream that makes it so impossibly smooth. When it bakes, the whole thing gets bubbly and rich, almost like liquid velvet waiting to coat whatever you dip into it. It sets up perfectly so it’s wonderfully spreadable but still holds its shape in the pie dish.
Quick Prep for Your Next Party Appetizer
Honestly, the best part is how fast it comes together. You only need about ten minutes of actual work before it heads into the oven! This makes it one of those lifesaver easy party snacks when you realize you forgot to prep something substantial. Seriously, you just mix, scoop, and bake. You can mix it up while your guests are walking through the door, and it’s ready before the first commercial break.
Ingredients for the Ultimate Cheesy Bread Dip
When you’re getting ready to whip this up, make sure you have everything measured out beforehand. It makes the mixing process fly by, and that’s important when you want to get this hot appetizer in the oven fast! Trust me, having all your bits and pieces ready is half the battle for any good garlic cheese spread.
For this truly decadent dip, you’ll need:
- 8 ounces cream cheese, softened—and I mean truly soft, not straight from the fridge!
- 1/2 cup sour cream
- 1/2 cup mayonnaise
- 1 cup shredded mozzarella cheese (this is for inside the base)
- 1/2 cup grated Parmesan cheese
- 4 cloves garlic, minced—don’t skimp here!
- 1/4 cup chopped fresh parsley
- 1/2 teaspoon onion powder
- 1/4 teaspoon black pepper
- 1/4 cup shredded mozzarella cheese (this goes right on top for that cheesy veil)
Ingredient Notes and Substitutions for Your Bread Dip
If you are going to use jarred garlic, you’ll need about a teaspoon, but I swear fresh garlic truly makes this cheesy bread dip sing. If you don’t have fresh parsley on hand, you can use about a tablespoon of dried parsley, though the fresh stuff really brightens up the flavor profile.
Now for substitutions—I know not everyone keeps sour cream stocked. If you’re in a pinch, using plain Greek yogurt instead works beautifully! It gives it a nice little tang, though it might thicken up a touch more during baking. If you want to get extra adventurous with your cheese blend and make it even stretchier, try swapping out half a cup of the internal mozzarella for Monterey Jack. It melts like a dream, although it doesn’t brown as nicely as pure mozzarella on the top layer.
How to Prepare This Warm Appetizer Idea
Getting this unbelievable warm appetizer idea ready is actually super straightforward. We’re focusing on speed here, but remember, every good dish needs a solid foundation! Getting the oven hot while you mix means we can slide this into the heat fast. If you’re looking for more speedy ideas, you have to check out my list of warm appetizer ideas for instant inspiration!
Mixing the Creamy Bread Dip Base
First things first, make sure that cream cheese is really soft, like spreadable butter soft. That’s the secret to avoiding lumps in your dip base! In your mixing bowl, start by beating the softened cream cheese, sour cream, and mayonnaise together until everything looks totally uniform and velvety smooth. Don’t rush this part; you want a good, creamy canvas before adding the flavor bombs. Once that’s silky, gently fold in the 1 cup of mozzarella, the Parmesan, the minced garlic—and wow, that garlic smell—along with the parsley, onion powder, and pepper until everything is just combined. Stop mixing as soon as you don’t see any dry patches!
Baking Instructions for the Perfect Bread Dip
Take your slightly greased 8-inch pie dish—I love using pie plates for this because the edges get extra crispy—and spread that glorious mixture right in there evenly. Then, sprinkle that final quarter cup of mozzarella right over the top. Pop it into your preheated 375-degree oven for about 20 to 25 minutes. You’re looking for visual perfection: it should be hot bubbling all the way through, and that top cheese layer needs to be melted with just a hint of golden brown color peeking through. Once it’s done, remember to let it rest for five minutes! That little cooling period keeps things safe and lets the dip settle just right before you start plunging in your slices of baguette.

Tips for Success When Making Your Bread Dip
Even though this recipe is super forgiving—which is why I love it so much—a couple of little tricks can take your final product from great to absolutely legendary. We all dread a runny bread dip, right? That happens when the cheese to dairy ratio is slightly off, or if you don’t use enough cheese inside the mix itself. My biggest tip to guarantee it always sets up nicely is to make sure your cream cheese and sour cream are well-incorporated before you introduce the heavier mozzarella and Parmesan. Beat those wet ingredients until they sigh contentedly!
Another thing people ask me about is the raw garlic. Now, I love a strong garlic punch, but if you’re worried about that raw bite, here’s how you fix it: mix the minced garlic in with the base ingredients, but then give that whole mixture a quick 15-minute rest on the counter before you sprinkle the top cheese layer and bake. That little bit of resting time lets the sharp edges of the garlic mellow out beautifully. It’s a tiny step that really improves the overall flavor profile before it hits the heat.
And definitely take advantage of the fact that you can make this ahead of time. I often mix up the entire dip—everything except the final sprinkle of cheese—the day before a big party, cover it tightly, and stick it in the fridge. Then, when everyone arrives, I just top it and bake. If you’re baking it straight from the fridge, just remember to add an extra five minutes to that baking time, because cold dairy needs a little longer to get properly hot and bubbly. You can find some other great make-ahead tips scattered throughout my general cooking guides!
Serving Suggestions for This Crowd Pleasing Dips
Okay, the dip is perfect—piping hot, gloriously cheesy, and smelling like a little slice of heaven. Now what do you use to scoop up this magic? The whole joy of a great dip is the vehicle you use to transport it to your mouth, right? Since this is so creamy and rich, we really want something that offers a fantastic texture contrast. Think crispy, sturdy, or crusty!
My absolute favorite thing to serve with this is a crusty baguette. Slice it thin, maybe brush it with a tiny bit of olive oil and toast it for just three minutes under the broiler before serving. That satisfying crunch against the warm, gooey cheese is just unbeatable. If you’re making this for a big party, grab a round loaf of sourdough, hollow out the middle (keep the bread chunks!), and use that bread bowl to serve the dip right in the center. It looks amazing and gives everyone something delicious to nibble on!
But let’s be real, sometimes people are grabbing crackers because they’re easier, or maybe you’ve got friends trying to keep it low-carb. For crackers, you need something robust—definitely skip those thin water crackers that will just snap off in the dip. Go for sturdy wheat crackers or rye crisps. They hold up beautifully under the weight of this heavy, cheesy bread dip.
If you’re looking for other great ways to start off a meal or even serve this at your next party, I have a whole section dedicated to fantastic starter ideas. The key is matching the dipper to the dip’s weight, which this recipe definitely has! You can browse through my list of go-to appetizer starters for more inspiration on pairing!
And don’t forget the veggies! If you want to add some fresh crunch, bell pepper strips—especially red and yellow ones—are great dippers because they are so sturdy. Celery sticks work well too, giving you that cool, crisp bite against all that warm fat and cheese. Honestly, I’ve seen people just eat this with sturdy tortilla chips, and wow, that works just as well!
Storage and Reheating for Leftover Bread Dip
Oh man, if there are leftovers—which honestly, rarely happens when I make this—you need to know how to handle them! This is such a rich dish, and we want to make sure that when you reheat it, it tastes just as amazing as it did fresh out of the oven the first time around. Don’t just toss it in the microwave and hope for the best; we need a strategy here!
For storage, once the dip has cooled to room temperature—please let it cool a little before you cover it, otherwise, you’re just trapping steam—transfer it to an airtight container. Since it has all those lovely dairy components, you should plan to eat it up within three to four days. If you followed my tip earlier and made it ahead of time, that’s technically your storage window too, just make sure it stays covered in the fridge.
Now, reheating is where people sometimes mess up the texture if they aren’t careful. The microwave is the fastest option, sure, but it can sometimes make the dip a little oily or lead to weird hot and cold spots. If you use the microwave, start with 30-second bursts, stirring really well between each burst until it’s heated through. You might need to stir in a tiny splash of milk or a teaspoon of sour cream if it’s gotten a little stiff.
But my absolute favorite way to bring this glorious dish back to life is back in the oven. Preheat your oven to 350 degrees Fahrenheit, pop the dip (in its oven-safe dish, naturally!) in there uncovered, and bake it for about 10 to 15 minutes. This gentle heat warms everything evenly, melts those cheeses back into creamy submission, and gets those edges nice and bubbly again without scorching the top. If the top starts looking a little dull, sprinkle a whisper more Parmesan on top before you put it back in for the last few minutes!
Frequently Asked Questions About This Bread Dip Recipe
It’s funny how many questions pop up around something so simple! But honestly, questions mean people are excited to make it, and I love helping you troubleshoot before you even start cooking. This is definitely a recipe people get creative with, especially when they are baking for big events like football Sundays. If you’re looking for more ideas specifically tailored for those big viewing parties, check out my whole list of game day dips—there’s something for everyone!
Can I make this bread dip ahead of time?
Yes, you absolutely can! And I highly suggest it for reducing stress right before guests arrive. You can mix up everything except that final topping of mozzarella cheese, cover the dish tightly with plastic wrap, and pop it in the fridge for up to 24 hours. When you are ready to bake it, just pull it out about 15 minutes before you plan to put it in the oven. Because it’s cold, you’ll need to add maybe five extra minutes to the baking time to ensure it gets nice and hot all the way through and bubbly on top.
What if I don’t have fresh parsley for this garlic cheese spread?
Don’t panic! While fresh parsley is lovely because it adds that bright, clean note to cut through the richness of the garlic cheese spread, dried parsley will certainly work in a pinch. If you’re using dried, use about one-third the amount of the fresh measurement. So, for our recipe, that means about two teaspoons of dried parsley mixed in with the base. If you happen to have fresh chives instead of parsley, those are also a fantastic substitute! They add back some of that nice oniony brightness that balances out all the rich dairy.
Is this considered one of the best dip recipes for a crowd?
Oh, without a shadow of a doubt! This creamy baked version is hands-down one of the best dip recipes I have ever made for a crowd. It’s rich, it’s warm, and everyone loves it, so it always disappears first at any party I host. If you find yourself having a genuinely huge get-together—say, more than 10 or 12 people—you should absolutely double the recipe. You can bake it in two separate 8-inch dishes or spread it right into a 9×13 baking dish. If you use the bigger dish, keep an eye on the edges; they might bake a little faster than the center, so check around 22 minutes!
Estimated Nutritional Data for This Simple Dipping Recipe
I always feel a little bit guilty looking at this recipe because, let’s be honest, it’s pure comfort food heaven—and that means it’s not exactly kale salad territory! But I believe in being totally transparent with you guys, so here is the estimated nutritional breakdown for one serving (which is 1/6th of the dip). This is really helpful to know, especially if you are keeping track for game day dips or just balancing out your menu.
Please remember that these numbers are just ballpark figures! The exact amounts of sodium and saturated fat can change based on the brand of mayo or sour cream you grab off the shelf. I always use full-fat ingredients because texture is non-negotiable in this recipe, so your results might vary a little if you go for low-fat substitutions. (If you need more low-effort snack ideas, check out my game day dips page!)
Here are the rough estimates based on the recipe proportions:
- Serving Size: 1/6 of dip
- Calories: About 250
- Total Fat: Around 22g (with 12g of that being Saturated Fat—oops!)
- Carbohydrates: Only 4g, which is great if you’re dipping veggies!
- Protein: Approximately 10g
- Sodium: Roughly 450mg
- Sugar: A low 2g
It’s richer than some other appetizers you might make, but when you consider that it’s supposed to be a very decadent starter, it’s not bad at all! Plus, it really stretches when you serve it with plenty of bread or crackers, so the actual amount per person might end up being even less.
Share Your Experience Making This Bread Dip
Whew! Now that you’ve got this incredible recipe card printed and your ingredients ready, it’s time for the best part: digging in! But before you take that amazing first bite, I would absolutely love to hear what you thought of this cheesy delight. It means the world to me when you try out my family favorites.
When you get a chance, please come back right here, give the recipe a star rating—let me know if it was a full five-star winner!—and leave a comment below. Tell me if you tried my substitution for Monterey Jack, or if you were brave enough to spice it up a little! I read every single comment, and seeing your results makes my day.
And hey, if you snap a picture of that beautiful, bubbly dish sitting out at your next party, tag me on social media! Nothing makes me happier than seeing my recipes being enjoyed at your table. If you need to get in touch with me personally for recipe questions or just to say hello, you can always drop me a line over on the contact page. Happy dipping, everyone!
PrintCreamy Baked Garlic Bread Dip

Make this rich, cheesy garlic bread dip for your next gathering. It bakes up hot and bubbly, perfect for dipping bread or crackers.
- Prep Time: 10 min
- Cook Time: 25 min
- Total Time: 35 min
- Yield: 6 servings
- Category: Appetizer
- Method: Baking
- Cuisine: American
- Diet: Vegetarian
Ingredients
- 8 ounces cream cheese, softened
- 1/2 cup sour cream
- 1/2 cup mayonnaise
- 1 cup shredded mozzarella cheese
- 1/2 cup grated Parmesan cheese
- 4 cloves garlic, minced
- 1/4 cup chopped fresh parsley
- 1/2 teaspoon onion powder
- 1/4 teaspoon black pepper
- 1/4 cup shredded mozzarella cheese (for topping)
Instructions
- Preheat your oven to 375 degrees Fahrenheit. Lightly grease an 8-inch pie plate or small oven-safe dish.
- In a medium bowl, combine the softened cream cheese, sour cream, and mayonnaise until smooth.
- Stir in the 1 cup of mozzarella cheese, Parmesan cheese, minced garlic, parsley, onion powder, and black pepper. Mix until all ingredients are evenly incorporated.
- Spread the mixture evenly into the prepared baking dish.
- Sprinkle the remaining 1/4 cup of mozzarella cheese over the top.
- Bake for 20 to 25 minutes, or until the dip is hot throughout and the cheese on top is melted and lightly golden brown.
- Let the dip cool for 5 minutes before serving warm with crusty bread or chips.
Notes
- You can prepare the dip mixture up to 24 hours in advance and keep it covered in the refrigerator. Add 5 minutes to the baking time if baking directly from the fridge.
- For extra flavor, add 1/4 teaspoon of garlic powder along with the minced garlic.
- Serve with sliced baguette, sourdough bread, or sturdy tortilla chips.
Nutrition
- Serving Size: 1/6 of dip
- Calories: 250
- Sugar: 2
- Sodium: 450
- Fat: 22
- Saturated Fat: 12
- Unsaturated Fat: 10
- Trans Fat: 0.5
- Carbohydrates: 4
- Fiber: 0
- Protein: 10
- Cholesterol: 55